Honhar Engineer

Honhar Engineer
Thanks for visiting,stay connected for more updates !
Showing posts with label Blogger. Show all posts

Thursday, December 4, 2014

how to remove 'A username and password are being requested by http://widcraft.googlecode.com. The site says: "Google Code Subversion Repository" ' ?

http://honharengineer.blogspot.in/


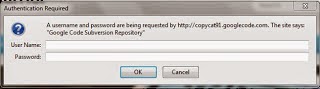
For many days my blog was giving a pop up asking for User name and password as shown below.

A username and password are being requested by http://widcraft.googlecode.com. 
The site says: "Google Code Subversion Repository".  
This was an annoying pop-up and I know many people tried to solve this problem?  

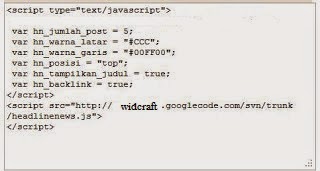
I came across a few sites mentioning this has something to do with the scripts used in widgets.  When I open up my design template and searching for the widcraft, it wouldn't appear?  I managed to view source using Firefox and located the script source which is inside one of widget as shown below.
http://honharengineer.blogspot.in/


Now, just remove this script and problem is solved.

Do comment if you are still facing any problem.

Thursday, April 17, 2014

12 Things to Do Before Applying for Google Adsense

I know many of you want to make some good money with adsense right? 
But it’s not easy to get into adsense program now a days. You have to do few things before applying for adsense.
Google Adsense is world’s larges Ads Network and works at Pay Per Click system. It’s paying rates are better than all of other networks which is the biggest reason it is so popular to all Bloggers and Webmasters. But since everybody is running behind them, they have made the approval system very strict. You make little mistakes and get disapproved every time. So you need a complete guidance and list of thing that you need to do before applying for Google Adsense and supposing that you are ready.
12 Things to Do Before Applying for Google Adsense

12 Things to Do Before Applying for Google Adsense

1. Privacy Policy :

One of the common mistakes that every Blogger makes and that I made many times before finally getting approved. Even though there are people out there who say that having a Privacy Policy for a Blog doesn’t makes sense but they are wrong.
A Privacy actually describes to your readers about what they will get on your Blog , what they should do and what they should not. So obviously there is nothing bad in having a Privacy Policy. While it can affect somehow on your Adsense Approval, you must give it a try. You can write it yourself or find Privacy Policy Generators online (You don’t need a lawyer anyway).

2. About Page

An About has major role and importance if you don’t want to apply for Adsense. But when it comes to Adsense, they are about Zero chances of getting approved if you are not showing this page.About page simply describes about you and your Blog . This will not only help you establish a relationship with readers but it will also make them trust upon you.

3. Contact Us Page

It’s quite obvious that everyone has his/her own opinion. What one of your readers likes may be bothering someone else. Than it is better to give them opportunity to speak up to you and tell how they feel about your Blog, what they want to be edited , what they liked or hated.
It will also show the Google Adsense Team that is viewing your site that you actually care about your readers and not only the money and Adsense.

4. Name/ Email Verification

Make sure to put you Name and Email address in some easily visible area like About Me and Contact Us pages. It will confirm to Google Adsense Team that it is the same person who applied for Adsense and not some spam, crappy bots.

5. Age Verification

I’m really laughing out typing this. ;)
Why?
Because this is where I encountered a problem. Instead of 18, I accidentally published my age as 17 while on Adsense Application Form, it was accurately 18.
Hence there started a problem . Because Google Adsense is not for under 18 people. I realized this problem after being disproved a few times without any legitimate reason. So I advice you to be accurate while typing your age.

6. Minimum Number of Posts

There is no exact answer. Not even one. Because I have seen very established Blogs with 400+ posts and their owner telling me that Google Adsense is rejecting them while somewhere ,people with 40,50 posts are enjoying making money. Exactly what I said that there is no actual answer. However, we can always predict things. According to my experience , you should only apply after you have more than 70 posts. Posts length should must be 500+ words too.
Read : Difference Between Short Length Post Vs Length Posts – What’s Best?

7. Design

Your Blog is the biggest thing after Content. This represents your expertise ,experience and Professionalism. So be careful because anything can kill your Chances.

8. Content Type

Be careful with what type of content you are publishing. Because it is something that truly matters. Google Adsense is not for Pornographic, Illegal Items, Drugs or other Blogs / Sites like that. Also Adsense team won’t be willing to allow you to step in if you own a Non English Blog. Having posts shorter than 300 words in length is also Red Signal.

9. Providing Value

Don’t complain about not making money and don’t clearly state that your are Blogging for Money only and have no other interest in it. Because this will show them that you will not be providing values to your readers any day. Hence another Red Light glows up.

10. Top Level Domain

12 Things to Do Before Applying for Google Adsense
Those are gone far away when Adsense used to approve “Blogspot” and “WordPress.com” Blogs. As for today, you must have your own unique domain that specifies your Blog. If you don’t have one yet, stop dreaming about getting approved with Sub domains and go buy a Top Level Domain.
Another important thing about domain is it’s age. Because for most of Asian Countries, Adsense has placed an age restriction. They don’t accept any sites before they are 6 months old.

11. Other Ad Networks

If you have any other Ads placed like Chitika, Clicksor or anything, it’s time to drop them off.
Even Google Adsense allows you to use other Ad Networks along with them, it’s better to remove the ads before Applying and don’t put them back until you get a reply from Adsense Team.

12. Paid Traffic 

Google hates the sites that are getting Paid traffic and mostly penalizes them so there is not a damn chance of getting Adsense Approval letter for a site that is getting paid traffic. You can bring traffic from Search Engines or any other way you want but if you want to earn via Google Adsense the right way, paid traffic is not a solution.

Wednesday, April 16, 2014

how to remove “powered by Blogger”


As we all know Blogger is a free and widely used blogging platform and we are providing more tips and tricks for beginners. Here we will see about a simple trick on how to remove “powered by Blogger” attribution from your Blogger blog. People who are using Blogger platform will have this powered by Blogger attribution below their blog. It comes by default in every template and it is an official representation for Blogger. Removing powered by Blogger attribution is simple. Just follow this step by step tutorial on how to remove powered by Blogger attribution using new HTML editor.

How to remove powered by Blogger attribution

  1. Go to Blogger.com and login to your Blogger profile
  2. Select  your blog that you wish to remove this attribute
  3. Now go to template and click edit HTML
    How to remove powered by Blogger attribute
  4. Here drop-down “jump to widget” option and from that list selectAttribution1 as highlighted below
    how to remove powered by Blogger attribution
  5. Now in the editor press ctrl + F and find for this line <b:widget id=’Attribution1′ locked=’true’ title=” type=’Attribution’>
    How to remove powered by Blogger attribution
  6. Now replace the locked=’true’ in to locked=’false’ as you can see highlighted below
    How to remove powered by Blogger attribution
  7. Once done click save template
  8. Now go to layout option and at the below you can see attribution gadget, click edit.
  9. In that popup window click remove and you are done
    How to remove powered by Blogger attribution
Now go and view your site where you won’t see the “powered by Blogger” attribution.
Your copyright text is also removed along with powered by Blogger attribution. To add copyright text just click add a gadget in layout settings select HTML/JavaScript, add your copyright text and drag and drop it below. Removing this powered by Blogger attribution adds uniqueness to your blog and it shows your professionalism. Hope this helped you on how to remove powered by Blogger attribution.

Tuesday, April 15, 2014

How To Add Auto Read More Button With Thumbnail in Blogger Blog?


Hello Friends! Hope that all of you are doing well. Today I have an important feature of Blogger to share with you. This feature is ‘Read More’ function.  Read More option enables us to show the some portion of the blog posts on the home page of blog or on the indexed or label pages. This is helpful feature because it is better to show more posts on the home page rather than showing a full lengthy single post.

This feature is coming inbuilt the new Blogger templates. But many Blogger Templates do not contain this feature and they show the full post on the blog or we have to manually add read more (Jump Break) between posts. Below I published the steps and code to add automatic read more option with thumbnail in your Blogger Template.

Auto Read More Button With Thumbnail.

  • First of all login into your Blogger account and select your blog.
  • Then go to Template > Edit HTML option.
  • Find the </head> tag in your template by pressing Ctrl + F.
  • Copy and paste the below given codes just above the founded tag.
<!-- Auto read more script Start -->
<script type='text/javascript'>
var thumbnail_mode = "yes"; //yes -with thumbnail, no -no thumbnail
summary_noimg = 430; //summary length when no image
summary_img = 340; //summary length when with image
img_thumb_height = 200;
img_thumb_width = 200;
</script>
<script type='text/javascript'>
//<![CDATA[
function removeHtmlTag(strx,chop){
if(strx.indexOf("<")!=-1)
{
var s = strx.split("<");
for(var i=0;i<s.length;i++){
if(s[i].indexOf(">")!=-1){
s[i] = s[i].substring(s[i].indexOf(">")+1,s[i].length);
}
}
strx =  s.join("");
}
chop = (chop < strx.length-1) ? chop : strx.length-2;
while(strx.charAt(chop-1)!=' ' && strx.indexOf(' ',chop)!=-1) chop++;
strx = strx.substring(0,chop-1);
return strx+'...';
}
function createSummaryAndThumb(pID){
var div = document.getElementById(pID);
var imgtag = "";
var img = div.getElementsByTagName("img");
var summ = summary_noimg;
        if(thumbnail_mode == "yes") {
if(img.length>=1) { imgtag = '<span style="float:left; padding:0px 10px 5px 0px;"><img src="'+img[0].src+'" width="'+img_thumb_width+'px" height="'+img_thumb_height+'px"/></span>';
summ = summary_img;
}
}
var summary = imgtag + '<div>' + removeHtmlTag(div.innerHTML,summ) + '</div>';
div.innerHTML = summary;
}
//]]>
</script>
<!-- Auto read more script End -->
  • Now find this code: <data:post.body/>
  • Replace this code with the code given below:
<!-- Auto read more Start -->
<b:if cond='data:blog.pageType == &quot;item&quot;'>
<data:post.body/>
<b:else/>
<b:if cond='data:blog.pageType == &quot;static_page&quot;'>
<data:post.body/>
<!-- http://www.hififun.net -->
<b:else/>
<div expr:id='&quot;summary&quot; + data:post.id'><data:post.body/></div>
<script type='text/javascript'> createSummaryAndThumb(&quot;summary<data:post.id/>&quot;);
</script>
<a class='more' expr:href='data:post.url'>Read more ...</a>
</b:if>
</b:if>
<!-- Auto read more End -->
  • Replace all if there is more than one code.
  • Save your template by clicking the Save button.
  • Done!
Test the working of this code by visiting to your blog.

Customization

If you want to customize the read more button with thumbnail then make the changes as explained below:

  • thumbnail_mode - change its value to ‘Yes’ if you want to show thumbnails along with post texts.
  • summary_img – Specify the number of characters you want to show with the thumbnail.
  • summary_noimg – Specify the number of characters you want to show without the thumbnail.
  • img_thumb_height and img_thumb_width -specify the thumbnail height and width (in pixels).
  • If you want to show something else instead of Read More text then you can change it with your own text.
I hope that this tutorial is helpful for you. If you are facing any problem or want to share your own experience then please explain it the comments bellow.

Thanks!

Sunday, April 13, 2014

10 Tips To Reduce Blog Loading Time

Reduce Blog Load Time


Blog loading speed is one of the important key  of popular site. To make your site popular it also depends on Blog loading time because if your site load faster than other sites then every one want to open your site just for it fast loading time. Many sites and blogs which have good and quality content are  ruined just cause of loading time so if your site or blog load faster than you will surely get more traffic as you never except.
So, Today we discussed on Blog’ loading time and also see some important tips to reduce Blog loading time which can make your site or blog load faster and show good result.

How To Check Blog Loading Time? 

Well here is many online speed checker tool to check your blog loading time in my point of view here is best tool of Google to check your blog loading time
Google speed checker tool is the best and free speed checker tool which show you accurate loading time of your blog or site.

How To Reduce Blog Loading Time?

To reduce blog loading here are some important effective tips which always work properly to reduce your blog loading time. So let’s have a look:-

1. Avoid To Use Of JavaScript
JavaScript is web scripting language which use to make scripts for Blog or a site. Its very useful for sites. Its also heavy for sites because the scripts are big in size so they effect on loading time so avoid to use too much of JavaScript and only use the scripts you need and link it with your blog.

2. Use Quality Blogger Templates
Be careful to use any template for your blog because many template are too much heavy and
have too much scripts they are not well coded so avoid to use such like these templates. Always try to use a Quality and well coded template for your blog and upload all images which are use in your template on your on server. And in Blogger make a draft post backup of all images which are using in templates.

3. Avoid To Use Too Much Images
Do not use many images in one post try to use one or two images in one post because images are heavy in size so they they also effect on blog loading time

4. Choose A Proper Format For Images
Do not use images which are in JPEG format because JPEG format is too heavy and large in size. So always try to convert images from JPEG to an other format like PNG and GIF because these are light format of images. 

5. Remove Extra Widgets
Do not use any un useful widget in your blog because too mush widgets can effect loading speed so best thing is to remove all un necessary and extra widgets from your blog.

6. Don’t Use Too Much Ads
Avoid to use too much ads on your blog some person wants to increase there earning from ads so they implement too much ads on your blog and at the result they also loose there traffic and visitor. So avoid to use too much ads on blog just implement some ads at important places of blog.

7. Don’t Use Popup Widgets and Ads
Avoid to use popup ads and widgets in your blog because these type of widgets and ads includes Java so that’s why avoid to use these type of items in your blog to get good results.

8. Resize Images For Better Results
Resize all image in your posts as a same format like PNG and GIF and also give all a same size because large size images make problems to open.

9. Use Read More Link In Your Posts
Always use read more link or read more buttons in posts it helps to load your site faster because if you use 2 or more images read more link hide these images from your home page and your site will be faster.

10. Show Few Posts On Homepage
Always try to show 4 or 5 posts on one page because too much posts on homepage can effect on loading time of your blog

Final Words:-
Above are all important tips which can help you to make your site load faster so you can also increase your visitors and also get more traffic if you need any kind of help then please leave a comment.