Honhar Engineer

Honhar Engineer
Thanks for visiting,stay connected for more updates !

Thursday, April 17, 2014

12 Things to Do Before Applying for Google Adsense

I know many of you want to make some good money with adsense right? 
But it’s not easy to get into adsense program now a days. You have to do few things before applying for adsense.
Google Adsense is world’s larges Ads Network and works at Pay Per Click system. It’s paying rates are better than all of other networks which is the biggest reason it is so popular to all Bloggers and Webmasters. But since everybody is running behind them, they have made the approval system very strict. You make little mistakes and get disapproved every time. So you need a complete guidance and list of thing that you need to do before applying for Google Adsense and supposing that you are ready.
12 Things to Do Before Applying for Google Adsense

12 Things to Do Before Applying for Google Adsense

1. Privacy Policy :

One of the common mistakes that every Blogger makes and that I made many times before finally getting approved. Even though there are people out there who say that having a Privacy Policy for a Blog doesn’t makes sense but they are wrong.
A Privacy actually describes to your readers about what they will get on your Blog , what they should do and what they should not. So obviously there is nothing bad in having a Privacy Policy. While it can affect somehow on your Adsense Approval, you must give it a try. You can write it yourself or find Privacy Policy Generators online (You don’t need a lawyer anyway).

2. About Page

An About has major role and importance if you don’t want to apply for Adsense. But when it comes to Adsense, they are about Zero chances of getting approved if you are not showing this page.About page simply describes about you and your Blog . This will not only help you establish a relationship with readers but it will also make them trust upon you.

3. Contact Us Page

It’s quite obvious that everyone has his/her own opinion. What one of your readers likes may be bothering someone else. Than it is better to give them opportunity to speak up to you and tell how they feel about your Blog, what they want to be edited , what they liked or hated.
It will also show the Google Adsense Team that is viewing your site that you actually care about your readers and not only the money and Adsense.

4. Name/ Email Verification

Make sure to put you Name and Email address in some easily visible area like About Me and Contact Us pages. It will confirm to Google Adsense Team that it is the same person who applied for Adsense and not some spam, crappy bots.

5. Age Verification

I’m really laughing out typing this. ;)
Why?
Because this is where I encountered a problem. Instead of 18, I accidentally published my age as 17 while on Adsense Application Form, it was accurately 18.
Hence there started a problem . Because Google Adsense is not for under 18 people. I realized this problem after being disproved a few times without any legitimate reason. So I advice you to be accurate while typing your age.

6. Minimum Number of Posts

There is no exact answer. Not even one. Because I have seen very established Blogs with 400+ posts and their owner telling me that Google Adsense is rejecting them while somewhere ,people with 40,50 posts are enjoying making money. Exactly what I said that there is no actual answer. However, we can always predict things. According to my experience , you should only apply after you have more than 70 posts. Posts length should must be 500+ words too.
Read : Difference Between Short Length Post Vs Length Posts – What’s Best?

7. Design

Your Blog is the biggest thing after Content. This represents your expertise ,experience and Professionalism. So be careful because anything can kill your Chances.

8. Content Type

Be careful with what type of content you are publishing. Because it is something that truly matters. Google Adsense is not for Pornographic, Illegal Items, Drugs or other Blogs / Sites like that. Also Adsense team won’t be willing to allow you to step in if you own a Non English Blog. Having posts shorter than 300 words in length is also Red Signal.

9. Providing Value

Don’t complain about not making money and don’t clearly state that your are Blogging for Money only and have no other interest in it. Because this will show them that you will not be providing values to your readers any day. Hence another Red Light glows up.

10. Top Level Domain

12 Things to Do Before Applying for Google Adsense
Those are gone far away when Adsense used to approve “Blogspot” and “WordPress.com” Blogs. As for today, you must have your own unique domain that specifies your Blog. If you don’t have one yet, stop dreaming about getting approved with Sub domains and go buy a Top Level Domain.
Another important thing about domain is it’s age. Because for most of Asian Countries, Adsense has placed an age restriction. They don’t accept any sites before they are 6 months old.

11. Other Ad Networks

If you have any other Ads placed like Chitika, Clicksor or anything, it’s time to drop them off.
Even Google Adsense allows you to use other Ad Networks along with them, it’s better to remove the ads before Applying and don’t put them back until you get a reply from Adsense Team.

12. Paid Traffic 

Google hates the sites that are getting Paid traffic and mostly penalizes them so there is not a damn chance of getting Adsense Approval letter for a site that is getting paid traffic. You can bring traffic from Search Engines or any other way you want but if you want to earn via Google Adsense the right way, paid traffic is not a solution.

Wednesday, April 16, 2014

how to remove “powered by Blogger”


As we all know Blogger is a free and widely used blogging platform and we are providing more tips and tricks for beginners. Here we will see about a simple trick on how to remove “powered by Blogger” attribution from your Blogger blog. People who are using Blogger platform will have this powered by Blogger attribution below their blog. It comes by default in every template and it is an official representation for Blogger. Removing powered by Blogger attribution is simple. Just follow this step by step tutorial on how to remove powered by Blogger attribution using new HTML editor.

How to remove powered by Blogger attribution

  1. Go to Blogger.com and login to your Blogger profile
  2. Select  your blog that you wish to remove this attribute
  3. Now go to template and click edit HTML
    How to remove powered by Blogger attribute
  4. Here drop-down “jump to widget” option and from that list selectAttribution1 as highlighted below
    how to remove powered by Blogger attribution
  5. Now in the editor press ctrl + F and find for this line <b:widget id=’Attribution1′ locked=’true’ title=” type=’Attribution’>
    How to remove powered by Blogger attribution
  6. Now replace the locked=’true’ in to locked=’false’ as you can see highlighted below
    How to remove powered by Blogger attribution
  7. Once done click save template
  8. Now go to layout option and at the below you can see attribution gadget, click edit.
  9. In that popup window click remove and you are done
    How to remove powered by Blogger attribution
Now go and view your site where you won’t see the “powered by Blogger” attribution.
Your copyright text is also removed along with powered by Blogger attribution. To add copyright text just click add a gadget in layout settings select HTML/JavaScript, add your copyright text and drag and drop it below. Removing this powered by Blogger attribution adds uniqueness to your blog and it shows your professionalism. Hope this helped you on how to remove powered by Blogger attribution.

Tuesday, April 15, 2014

Open RAR File / Extract RAR Files Under Linux or UNIX


RAR files are in compressed archive format, if you have downloaded rar files from the Internet, you need to unpack or unrar them (extract rar files). RAR is a proprietary file format for data compression and archiving, developed by Eugene Roshal. The command used to extract these files is called "unrar". By default, unrar is not being installed on Linux, FreeBSD or UNIX like operating system. You can install unrar command with the help of apt-get or yum command. 

Install unrar command

Under Debian or Ubuntu Linux, you need to type apt-get command as follows to install unrar program:
# apt-get install unrar
If you are using Fedora core Linux / CentOS / RHEL, use yum command as follows :
# yum install unrar
If you are using FreeBSD, enter:
# pkg_add -v -r unrar
If any of above, methods is not working for you, download binary package from official rarlab site:
$ cd /tmp
$ wget http://www.rarlab.com/rar/rarlinux-3.6.0.tar.gz
Next, untar file, enter:
$ tar -zxvf rarlinux-3.6.0.tar.gz
Both unrar and rar commands are located in rar sub-directory. Just cd to rar directory, type:
$ cd rar
$ ./unrar
Now copy rar and unrar file to /bin directory, type:
# cp rar unrar /bin

HowTo: Use unrar Command

The unrar command supports various options, below are common options that you need to for extracting files.

Task: Exreact rar (unpack) File

To extract file.rar file into the current directory, enter:
$ unrar e file.rar

Task: List (l) file inside rar archive:

$ unrar l file.rar

Task: To extract (x) files with full path type command:

$ unrar x file.rar
(D) To test (t) integrity of archive, file type command:
$ unrar t file.rar

How do I open rar file under MS-Windows XP/NT/2000/7/8?

  • If you are using MS-Windows XP / 7 / 8, download Winrar. It is free download (free to try License) software.

How To Add Auto Read More Button With Thumbnail in Blogger Blog?


Hello Friends! Hope that all of you are doing well. Today I have an important feature of Blogger to share with you. This feature is ‘Read More’ function.  Read More option enables us to show the some portion of the blog posts on the home page of blog or on the indexed or label pages. This is helpful feature because it is better to show more posts on the home page rather than showing a full lengthy single post.

This feature is coming inbuilt the new Blogger templates. But many Blogger Templates do not contain this feature and they show the full post on the blog or we have to manually add read more (Jump Break) between posts. Below I published the steps and code to add automatic read more option with thumbnail in your Blogger Template.

Auto Read More Button With Thumbnail.

  • First of all login into your Blogger account and select your blog.
  • Then go to Template > Edit HTML option.
  • Find the </head> tag in your template by pressing Ctrl + F.
  • Copy and paste the below given codes just above the founded tag.
<!-- Auto read more script Start -->
<script type='text/javascript'>
var thumbnail_mode = "yes"; //yes -with thumbnail, no -no thumbnail
summary_noimg = 430; //summary length when no image
summary_img = 340; //summary length when with image
img_thumb_height = 200;
img_thumb_width = 200;
</script>
<script type='text/javascript'>
//<![CDATA[
function removeHtmlTag(strx,chop){
if(strx.indexOf("<")!=-1)
{
var s = strx.split("<");
for(var i=0;i<s.length;i++){
if(s[i].indexOf(">")!=-1){
s[i] = s[i].substring(s[i].indexOf(">")+1,s[i].length);
}
}
strx =  s.join("");
}
chop = (chop < strx.length-1) ? chop : strx.length-2;
while(strx.charAt(chop-1)!=' ' && strx.indexOf(' ',chop)!=-1) chop++;
strx = strx.substring(0,chop-1);
return strx+'...';
}
function createSummaryAndThumb(pID){
var div = document.getElementById(pID);
var imgtag = "";
var img = div.getElementsByTagName("img");
var summ = summary_noimg;
        if(thumbnail_mode == "yes") {
if(img.length>=1) { imgtag = '<span style="float:left; padding:0px 10px 5px 0px;"><img src="'+img[0].src+'" width="'+img_thumb_width+'px" height="'+img_thumb_height+'px"/></span>';
summ = summary_img;
}
}
var summary = imgtag + '<div>' + removeHtmlTag(div.innerHTML,summ) + '</div>';
div.innerHTML = summary;
}
//]]>
</script>
<!-- Auto read more script End -->
  • Now find this code: <data:post.body/>
  • Replace this code with the code given below:
<!-- Auto read more Start -->
<b:if cond='data:blog.pageType == &quot;item&quot;'>
<data:post.body/>
<b:else/>
<b:if cond='data:blog.pageType == &quot;static_page&quot;'>
<data:post.body/>
<!-- http://www.hififun.net -->
<b:else/>
<div expr:id='&quot;summary&quot; + data:post.id'><data:post.body/></div>
<script type='text/javascript'> createSummaryAndThumb(&quot;summary<data:post.id/>&quot;);
</script>
<a class='more' expr:href='data:post.url'>Read more ...</a>
</b:if>
</b:if>
<!-- Auto read more End -->
  • Replace all if there is more than one code.
  • Save your template by clicking the Save button.
  • Done!
Test the working of this code by visiting to your blog.

Customization

If you want to customize the read more button with thumbnail then make the changes as explained below:

  • thumbnail_mode - change its value to ‘Yes’ if you want to show thumbnails along with post texts.
  • summary_img – Specify the number of characters you want to show with the thumbnail.
  • summary_noimg – Specify the number of characters you want to show without the thumbnail.
  • img_thumb_height and img_thumb_width -specify the thumbnail height and width (in pixels).
  • If you want to show something else instead of Read More text then you can change it with your own text.
I hope that this tutorial is helpful for you. If you are facing any problem or want to share your own experience then please explain it the comments bellow.

Thanks!

Monday, April 14, 2014

WiMAX and Wi-Fi Comparison


WiMAX is similar to the wireless standard known as Wi-Fi, but on a much larger scale and at faster speeds. A nomadic version would keep WiMAX-enabled devices connected over large areas, much like today.s cell phones. We can compare it with Wi-Fi based on the following factors.

IEEE Standards:

Wi-Fi is based on IEEE 802.11 standard where as WiMAX is based on IEEE 802.16. However, both are IEEE standards.

Range:

Wi-Fi typically provides local network access for around a few hundred feet with speeds of up to 54 Mbps, a single WiMAX antenna is expected to have a range of up to 40 miles with speeds of 70 Mbps or more. As such, WiMAX can bring the underlying Internet connection needed to service localWi-Fi networks.

Scalability:

Wi-Fi is intended for LAN applications, users scale from one to tens with one subscriber for each CPE device. Fixed channel sizes (20MHz).
WiMAX is designed to efficiently support from one to hundreds of Consumer premises equipments (CPE)s, with unlimited subscribers behind each CPE. Flexible channel sizes from 1.5MHz to 20MHz.

Bit rate:

Wi-Fi works at 2.7 bps/Hz and can peak up to 54 Mbps in 20 MHz channel.
WiMAX works at 5 bps/Hz and can peak up to 100 Mbps in a 20 MHz channel.

Quality of Service:

Wi-Fi does not guarantee any QoS but WiMax will provide your several level of QoS.
As such, WiMAX can bring the underlying Internet connection needed to service local Wi-Fi networks. Wi-Fi does not provide ubiquitous broadband while WiMAX does.

Comparison Table:

FreatureWiMax
(802.16a)
Wi-Fi
(802.11b)
Wi-Fi
(802.11a/g)
Primary
Application
Broadband Wireless
Access
Wireless LANWireless LAN
Frequency BandLicensed/Unlicensed
2 G to 11 GHz
2.4 GHz ISM2.4 GHz ISM (g)
5 GHz U-NII (a)
Channel
Bandwidth
Adjustable
1.25 M to 20 MHz
25 MHz20 MHz
Half/Full DuplexFullHalfHalf
Radio TechnologyOFDM
(256-channels)
Direct Sequence
Spread Spectrum
OFDM
(64-channels)
Bandwidth
Efficiency
<=5 bps/Hz<=0.44 bps/Hz<=2.7 bps/Hz
ModulationBPSK, QPSK,
16-, 64-, 256-QAM
QPSKBPSK, QPSK,
16-, 64-QAM
FECConvolutional Code
Reed-Solomon
NoneConvolutional Code
EncryptionMandatory- 3DES
Optional- AES
Optional- RC4
(AES in 802.11i)
Optional- RC4
(AES in 802.11i)
MobilityMobile WiMax
(802.16e)
In developmentIn development
MeshYesVendor
Proprietary
Vendor Proprietary
Access ProtocolRequest/GrantCSMA/CACSMA/CA

How to Transfer files from Android to Windows Computer

At present, Android OS and Android phones are very popular and handy to use. With so many developed apps you can do more things with it. You can use your Android phones as a storage device with so many photos, music, videos and many more. In this situation, there is a definite chance of losing important files accidentally.

When this happen, many people may choose "Android file transfer" to backup your important files to pc, but the program for Mac users only. If you are a Windows user, and want to get a program as "Android file transfer for Windows", you are get the right place. We recommend MobileGo for Android, it is an android manager by which you can manage your android device files from your PC, and it can transfer files from your Android Device to PC easily.

download win version

Note: If you are a Mac user, and feel the Android file transfer (Mac) is suck, no problem, you can Download MobileGo for Android (Mac) here, it is the best alternative to Android file transfer.


More feature about Wondershare MobileGo for Android

connect


1. MobileGo can backup everything that's important on your phone onto PC. This includes SMS logs, catalogs, videos, music, photos, apps, contacts.

2. If you want to restore it all again, you can restore all or selected backed-up files to your Android phone with a click.

3. Freely transfer any of your favorite movies and music files from PC to your phone without worrying about the compatibility of file formats.

4. Easily import iTunes playlists to your Android phone or export the music back to your iTunes library.

5. Transfer & Edit Your Contacts Freely: You can import/export contacts from vCard files, Outlook Express, Windows Address Book, Windows Mail and Outlook 2003/2007/2010/2013, you can find duplicate contacts, you can add new contacts via PC.

6. Desktop SMS Assistant: You can text the same message to all your friends from you PC all in one go. You can import messages in .xml format from computer to your device or export text messages from device to computer as .xml or .txt files; You can hang up or reply with a message directly from your computer.

7. Manage Your Apps: Install/Export/Move/Share Apps.

8. One Click to download apps and videos from Google Play and YouTube.

9. Collect your favorite websites to MobileGo and visit them more conveniently then usual.

how to tie a tie in 5 easy steps

Whether you are a College student or any working professional you must know how to tie a tie so, I hope you will learn it by given clear illustrations and simple directions which makes learning how to tie a tie easy. Choose from how to tie a Windsor tie like James Bond or shoot for the classic Four-in-Hand. Just take a look below, then start practicing in front of a mirror.

Tying a Windsor Tie...

tie a tie step 1

Windsor: Step One

Cross the wide end over the narrow, then slip the wide end up between the tie and the collar, then simply drop it back down.


tie a tie step 2

 Windsor: Step Two

Wrap the wide end behind the narrow end from right to left.


tie a tie step 3

Windsor: Step Three

Bring the wide end in front and over the loop between the collar and tie.


tie a tie step 4

Windsor: Step Four

Wrap the wide end around the narrow part one more time and slip up through the loop again.


tie a tie step 5

Windsor: Step Five

Loosely stabilizing the knot, slip the wide end through it. Center the dimple. Tighten.


Now onto the Four-in-Hand...

tying a tie step 1


Four-in-Hand: Step One 

Begin with the fat end of your tie on your right and extend it about ten inches below the skinny end.


tying a tie step 2

Four-in-Hand: Step Two

Cross the wide end of the tie over the narrow end of the tie and then continue underneath.


tying a tie step 3


Four-in-Hand: Step Three

Cross the wide end over the narrow part one more time.


tying a tie step 4


Four-in-Hand: Step Four

Cross the wide end over the narrow part one more time.


tying a tie step 5

Four-in-Hand: Step Five

Hold the knot steady and slip the wide end down through the knot. Center dimple. Tighten.

Sunday, April 13, 2014

10 Tips To Reduce Blog Loading Time

Reduce Blog Load Time


Blog loading speed is one of the important key  of popular site. To make your site popular it also depends on Blog loading time because if your site load faster than other sites then every one want to open your site just for it fast loading time. Many sites and blogs which have good and quality content are  ruined just cause of loading time so if your site or blog load faster than you will surely get more traffic as you never except.
So, Today we discussed on Blog’ loading time and also see some important tips to reduce Blog loading time which can make your site or blog load faster and show good result.

How To Check Blog Loading Time? 

Well here is many online speed checker tool to check your blog loading time in my point of view here is best tool of Google to check your blog loading time
Google speed checker tool is the best and free speed checker tool which show you accurate loading time of your blog or site.

How To Reduce Blog Loading Time?

To reduce blog loading here are some important effective tips which always work properly to reduce your blog loading time. So let’s have a look:-

1. Avoid To Use Of JavaScript
JavaScript is web scripting language which use to make scripts for Blog or a site. Its very useful for sites. Its also heavy for sites because the scripts are big in size so they effect on loading time so avoid to use too much of JavaScript and only use the scripts you need and link it with your blog.

2. Use Quality Blogger Templates
Be careful to use any template for your blog because many template are too much heavy and
have too much scripts they are not well coded so avoid to use such like these templates. Always try to use a Quality and well coded template for your blog and upload all images which are use in your template on your on server. And in Blogger make a draft post backup of all images which are using in templates.

3. Avoid To Use Too Much Images
Do not use many images in one post try to use one or two images in one post because images are heavy in size so they they also effect on blog loading time

4. Choose A Proper Format For Images
Do not use images which are in JPEG format because JPEG format is too heavy and large in size. So always try to convert images from JPEG to an other format like PNG and GIF because these are light format of images. 

5. Remove Extra Widgets
Do not use any un useful widget in your blog because too mush widgets can effect loading speed so best thing is to remove all un necessary and extra widgets from your blog.

6. Don’t Use Too Much Ads
Avoid to use too much ads on your blog some person wants to increase there earning from ads so they implement too much ads on your blog and at the result they also loose there traffic and visitor. So avoid to use too much ads on blog just implement some ads at important places of blog.

7. Don’t Use Popup Widgets and Ads
Avoid to use popup ads and widgets in your blog because these type of widgets and ads includes Java so that’s why avoid to use these type of items in your blog to get good results.

8. Resize Images For Better Results
Resize all image in your posts as a same format like PNG and GIF and also give all a same size because large size images make problems to open.

9. Use Read More Link In Your Posts
Always use read more link or read more buttons in posts it helps to load your site faster because if you use 2 or more images read more link hide these images from your home page and your site will be faster.

10. Show Few Posts On Homepage
Always try to show 4 or 5 posts on one page because too much posts on homepage can effect on loading time of your blog

Final Words:-
Above are all important tips which can help you to make your site load faster so you can also increase your visitors and also get more traffic if you need any kind of help then please leave a comment.  

Saturday, April 12, 2014

How to change repositories to a different mirror?

Change repositories to different mirror - blackMORE Ops
This is a guide on How to change repositories to a different mirror that applies to all Linux distributions. Often you would feel the auto selected mirror via GeoIP is not the fastest one of you’re just paranoid like me who would want to select a mirror from a specific country. This guide would help you to select mirrors manually and control where you download updates from. It might also help you speed up your download if you manage to select a good one.
I am not the original author of this guide, g0tmi1k from Kali Forums wrote it and it is a wonderful guide on how to change repositories to a different mirror.
I am redistributing this to make it more available in search engines as I too failed to find a well written guide on achieve this. I am not even going to try to re-write anything as this Guide is just too good. This was originally written for Kali Linux but any Linux user can find a mirror of their choice, and replace the links to point to their chosen mirror. Other distro users, feel free to leave a comment if you need help.
Original post link How to change the repositories to a different official mirror. Again kudos to gotli1lk for this great guide.

Related posts:

So here goes..

How to change repositories to a different mirror

There are several mirrors of the Kali Linux repository server, all of which are spread over the world.
Each time you interact with the repository, by default it will automatically use the mirror that is closest to you based on your geoip location (idea being, this will give you the best speed due to less latency).
For whatever reason, you may wish to manually force kali to use a certain/different mirror rather than the one that is nearest you.
Warning: Doing so, if that mirror stops functioning, you will no longer receive updates.

Find your mirror

To start with, you can see what mirror you’re using and other ones near by, by visiting this URL: http://http.kali.org/README.mirrorlist
For example:
 Found 1 mirror which handle this country (GB):

 http://ftp.hands.com/kali/README (gb, prio 100)
 Found 5 mirrors in other countries, but same continent (EU):

 http://ftp.free.fr/pub/kali/README (fr, prio 200)
 http://mirror.pcextreme.nl/kali/README (nl, prio 200)
 http://ftp.halifax.rwth-aachen.de/kali/README (de, prio 100)
 http://kali.mirror.garr.it/mirrors/kali/README (it, prio 100)
 http://ftp.cc.uoc.gr/mirrors/linux/kali/kali/README (gr, prio 100)
…So from the looks of it, in this example ‘ftp.hands.com’ is being used. Lets switch to ‘kali.mirror.garr.it’
(there isn’t a reason or justification for this, just a server that was picked at random).

Make a backup of your sources.list file

Before making any modifications, its highly recommended that you create a backup of any files that will be altered.
This can be done by running:
root@kali ~$ cp -f /etc/apt/sources.list{,.bkup}

Change mirror in sources.list file

The default source.list file looks like:
 root@kali~$ cat /etc/apt/sources.list | grep -v '^#' | uniq

 deb http://http.kali.org/kali kali main non-free contrib
 deb-src http://http.kali.org/kali kali main non-free contrib

 deb http://security.kali.org/kali-security kali/updates main contrib non-free
 root@kali~$
So we will replace default values with ‘kali.mirror.garr.it’.
From: http – README.mirrorlist we can see the base HTTP URL is: kali.mirror.garr.it/mirrors/kali/
 Before (default/original)
   deb http://http.kali.org/kali kali main non-free contrib
   deb-src http://http.kali.org/kali kali main non-free contrib

 After (static mirror/manually altering)
   deb http://kali.mirror.garr.it/mirrors/kali/  kali main non-free contrib
   deb-src http://kali.mirror.garr.it/mirrors/kali/ kali main non-free contrib
From: security – README.mirrorlist we can see the base security URL is: kali.mirror.garr.it/mirrors/kali-security/
 Before (default/original)
   deb http://security.kali.org/kali-security kali/updates main contrib non-free

 After (static mirror/manually altering)
   deb http://kali.mirror.garr.it/mirrors/kali-security/ kali main non-free contrib
Therefore we can make the switch to ‘kali.mirror.garr.it’ by using the default values as a template, and merging in the information above.

Example command:

 echo '# kali.mirror.garr.it
 deb http://kali.mirror.garr.it/mirrors/kali/ kali main non-free contrib
 deb-src http://kali.mirror.garr.it/mirrors/kali/ kali main non-free contrib

 deb http://kali.mirror.garr.it/mirrors/kali-security/ kali main non-free contrib' > 
/etc/apt/sources.list

The result looks like this:

 root@kali:~# echo '# kali.mirror.garr.it
 > deb http://kali.mirror.garr.it/mirrors/kali/ kali main non-free contrib
 > deb-src http://kali.mirror.garr.it/mirrors/kali/ kali main non-free contrib
 >
 > deb http://kali.mirror.garr.it/mirrors/kali-security/ kali main non-free contrib' >
 /etc/apt/sources.list
 root@kali:~# cat /etc/apt/sources.list
 # kali.mirror.garr.it
 deb http://kali.mirror.garr.it/mirrors/kali/ kali main non-free contrib
 deb-src http://kali.mirror.garr.it/mirrors/kali/ kali main non-free contrib

 deb http://kali.mirror.garr.it/mirrors/kali-security/ kali main non-free contrib
 root@kali:~#

Test your change

We can then test it out by doing ‘apt-get update’:
 root@kali:~# apt-get update
 Get:1 http://kali.mirror.garr.it kali Release.gpg [836 B]
 Get:2 http://kali.mirror.garr.it kali Release.gpg [836 B]
 Get:3 http://kali.mirror.garr.it kali Release [21.1 kB]
 Get:4 http://kali.mirror.garr.it kali Release [8,791 B]
 Get:5 http://kali.mirror.garr.it kali/main Sources [7,531 kB]
 Get:6 http://kali.mirror.garr.it kali/non-free Sources [117 kB]
 Get:7 http://kali.mirror.garr.it kali/contrib Sources [55.5 kB]
 Get:8 http://kali.mirror.garr.it kali/main i386 Packages [8,450 kB]
 Get:9 http://kali.mirror.garr.it kali/non-free i386 Packages [115 kB]
 Get:10 http://kali.mirror.garr.it kali/contrib i386 Packages [55.2 kB]
 Get:11 http://kali.mirror.garr.it kali/main i386 Packages [284 kB]
 Get:12 http://kali.mirror.garr.it kali/non-free i386 Packages [20 B]
 Get:13 http://kali.mirror.garr.it kali/contrib i386 Packages [616 B]
 Ign http://kali.mirror.garr.it kali/contrib Translation-en_GB
 Ign http://kali.mirror.garr.it kali/contrib Translation-en
 Ign http://kali.mirror.garr.it kali/main Translation-en_GB
 Ign http://kali.mirror.garr.it kali/main Translation-en
 Ign http://kali.mirror.garr.it kali/non-free Translation-en_GB
 Ign http://kali.mirror.garr.it kali/non-free Translation-en
 Fetched 16.6 MB in 11s (1,388 kB/s)
 Reading package lists... Done
 root@kali:~#
no warnings :)
Done!

Rollback changes

If anything goes wrong at any stage or the server isn’t working, we are able to restore from the backup by doing:
 root@kali:~# cp -f /etc/apt/sources.list{.bkup,}
 root@kali:~# apt-get update
 Get:1 http://security.kali.org kali/updates Release.gpg [836 B]
 Get:2 http://http.kali.org kali Release.gpg [836 B]
 Get:3 http://security.kali.org kali/updates Release [11.0 kB]
 Get:4 http://http.kali.org kali Release [21.1 kB]
 Get:5 http://security.kali.org kali/updates/main i386 Packages [143 kB]
 Get:6 http://http.kali.org kali/main Sources [7,531 kB]
 Ign http://security.kali.org kali/updates/contrib Translation-en_GB
 Ign http://security.kali.org kali/updates/contrib Translation-en
 Ign http://security.kali.org kali/updates/main Translation-en_GB
 Ign http://security.kali.org kali/updates/main Translation-en
 Ign http://security.kali.org kali/updates/non-free Translation-en_GB
 Ign http://security.kali.org kali/updates/non-free Translation-en
 Ign http://http.kali.org kali/contrib Translation-en_GB
 Ign http://http.kali.org kali/contrib Translation-en
 Ign http://http.kali.org kali/main Translation-en_GB
 Ign http://http.kali.org kali/main Translation-en
 Ign http://http.kali.org kali/non-free Translation-en_GB
 Ign http://http.kali.org kali/non-free Translation-en
 Get:7 http://http.kali.org kali/non-free Sources [117 kB]
 Get:8 http://security.kali.org kali/updates/contrib i386 Packages [20 B]
 Get:9 http://http.kali.org kali/contrib Sources [55.5 kB]
 Get:10 http://security.kali.org kali/updates/non-free i386 Packages [20 B]
 Get:11 http://http.kali.org kali/main i386 Packages [8,450 kB]
 Get:12 http://http.kali.org kali/non-free i386 Packages [115 kB]
 Get:13 http://http.kali.org kali/contrib i386 Packages [55.2 kB]
 Fetched 16.5 MB in 18s (870 kB/s)
 Reading package lists... Done
 root@kali:~#
and everything is back to normal :)

Related posts:

Bookmarks/Handy links specific for Kali Linux:


Thanks for reading.

How to fix Kali Linux apt-get slow update?

How to fix Kali apt-get slow update - blackMORE Ops

How to fix Kali Linux apt-get slow update?

This is a small guide on How to fix Kali Linux apt-get slow update.
Kali is relatively new and got fewer Mirrors than some other distro’s. That means less servers to download from and less servers means more people trying to download from them and using all bandwidth. So when you type in apt-get update, you see a slow download speed for packages. This just means you’re connected to a server that’s really busy. Some users complains that nothing happens or they are not getting any updates at all. Some got different issues like update stuck is header and doesn’t move any further.
To fix this, you need to check a few things:
  1. Check if you have the right repositories is your /etc/apt/sources.list
  2. Remove unwanted or unsupported repositories.
  3. Clean apt-get cache.
  4. Choose a fast DNS server.
To fix sources.list, follow this guide:  
To switch repositories to a different mirror of your choice, follow this guide: How to change repositories to a different mirror?

Clean apt-get cache:

apt-get clean

Choose a proper DNS server:

Edit resolv.conf file:
leafpad /etc/resolv.conf

Enter Google DNS nameservers

Following two are Google DNS, let’s face it, if Google is broken, we all think Internet is broken. Hence the reason of using Google DNS. You can choose other DNS Server if you want that are fast and reliable.
nameserver 8.8.8.8
nameserver 8.8.4.4
Now save and close the file.

Test your changes

Let put our changes to the test..

Do an apt-get update

 apt-get update

Do and upgrade

 apt-get upgrade

Finally do a distribution upgrade

 apt-get dist-upgrade
Your download speed should be a lot better than you were getting previously.

Another solution, changing from HTTP to REPO in sources.list file (14/02/2014)

One of the readers advised that by changing the repositories from HTTP to REPO, he gained significant speed up. 
Use the following repositories (update your sources.list file)
## Kali Regular repositories
deb http://repo.kali.org/kali kali main non-free contrib
deb http://security.kali.org/kali-security kali/updates main contrib non-free
## Kali Source repositories
deb-src http://repo.kali.org/kali kali main non-free contrib
deb-src http://security.kali.org/kali-security kali/updates main contrib non-free
Instead of
## Kali Regular repositories
deb http://http.kali.org/kali kali main non-free contrib
deb http://security.kali.org/kali-security kali/updates main contrib non-free
## Kali Source repositories
deb-src http://http.kali.org/kali kali main non-free contrib
deb-src http://security.kali.org/kali-security kali/updates main contrib non-free
This change seems to boost speed as it uses slightly different repo than the usual HTTP servers which are overloaded. Let us know how this worked for you.
In case your sources.list file is messed up or you’re just not sure, what to put on there, follow these instruction’s to add official Kali Linux Repositories.
(Note: The above mentioned repositories are a slightly variant of the official one, you can choose either as they are both from Kali.org)
In case your DNS server is picking up (even Google’s DNS server) a repository from a different country(or avoid a specific country) and you would like to manually switch repositories to a different mirror of your choice(say in same country or just something you know working faster, follow these instruction to change repositories to a different mirror.

Thanks for reading.
Please comment your experience to make this guide better.
If you’ve found this useful, share and follow us on Facebook/Twitter.

How to add official Kali Linux Repositories?

How to add official Kali Linux Repositories - blackMORE Ops 

How to add official Kali Linux Repositories?

This is a small guide on How to add official Kali Linux Repositories.
Kali Linux source.list Repositories page: Official Link
We’ve seen many people break their Kali Linux installations by following unofficial advice, or arbitrarily populating their sources.list file with unneeded repositories. The following post aims to clarify what repositories should exist in sources.list, and when they should be used.
Any additional repositories added to the Kali sources.list file will most likely BREAK YOUR KALI LINUX INSTALL.
The simplest way is to edit the /etc/apt/sources.list remove or comment every-line with # at the front and add the following lines..

Open sources.list and comment all lines with # in front

 leafpad /etc/apt/sources.list

Add Official Repo’s only:

## Regular repositories
deb http://http.kali.org/kali kali main non-free contrib
deb http://security.kali.org/kali-security kali/updates main contrib non-free
## Source repositories
deb-src http://http.kali.org/kali kali main non-free contrib
deb-src http://security.kali.org/kali-security kali/updates main contrib non-free
Save and close the file.

Clean your apt-get

apt-get clean
STOP: If your Kali Linux apt-get update is slow follow this guide to sort out other issues: How to fix Kali apt-get slow update?
To switch repositories to a different mirror of your choice, follow this guide: How to change repositories to a different mirror?

Do an apt-get update

apt-get update

Do and upgrade

apt-get upgrade

Finally do a distribution upgrade

apt-get dist-upgrade
That’s it, you’re set.

Conclusion

To fix Kali apt-get slow update follow this guide:
To switch repositories to a different mirror of your choice, follow this guide: How to change repositories to a different mirror?
End of guide How to add official Kali Linux Repositories.

Wednesday, April 9, 2014

Fix sound mute in Kali Linux on boot

If you’ve installed Kali Linux then you already know that the sound option is mute or disabled at the boot. No matter what you do, next time you restart Kali Linux, you will again have sound mute in Kali Linux on boot. You might want to start Kali Linux with a great sound effect (Ka-BOOM!!) or you probably spend a few moments to unmute sound and then turn on the volume. After sometime, this gets annoying and you start looking into the wide world of web (actually the correct term is World Wide Web aka WWW but you already knew that!) and ended up here. So let’s not wait more and fix this issue once and for all.
In this guide we will fix 2 things
  1. Fix sound mute in Kali Linux on boot time.
  2. Keep that settings and volume from previous session.

Fix sound mute in Kali Linux on boot

Follow the steps below to fix sound mute in Kali Linux on boot
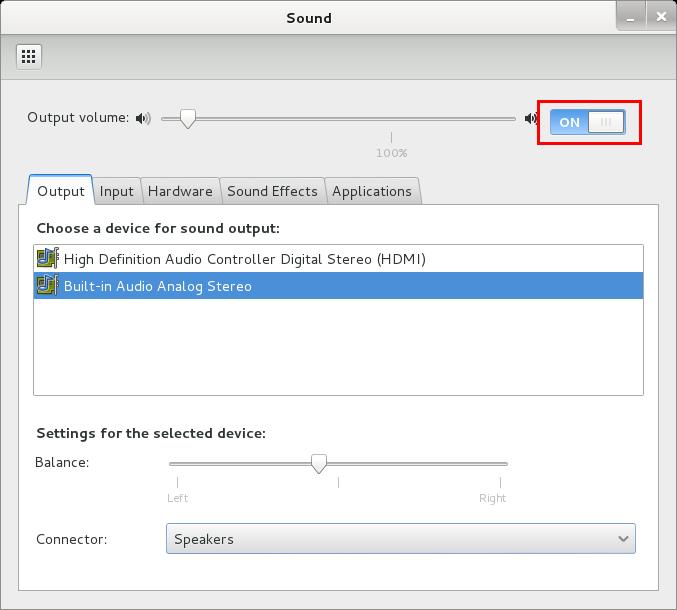
Go to Applications > System Tools > Preferences  > System Settings > Sound to bring up the same options.
Now you should see the following screen:
Fix sound mute in Kali Linux on boot - 2 - blackMORE Ops

  • Use the Output volume slider to ON, shown similar the screenshot above. That’s it you’re done. Close Sound window.
Debian and Kali Linux users also see this warning “(warning) in Kali Linux and Debian problem during boot time”. If you’re here looking for a solution follow this other guide Fixing PulseAudio configured for per-user sessions … (warning) in Kali Linux and Debian 

Finally restart to confirm

Once restarted, your Kali Linux should retain volume control and this should fix sound mute in Kali Linux on boot.
Hope this was helpful to you. 
Thanks for reading and please share.

Fixing PulseAudio configured for per-user sessions … (warning) in Kali Linux and Debian

What is PulseAudio:

PulseAudio Logo
PulseAudio is a sound system for POSIX OSes, meaning that it is a proxy for your sound applications. It allows you to do advanced operations on your sound data as it passes between your application and your hardware. Things like transferring the audio to a different machine, changing the sample format or channel count and mixing several sounds into one are easily achieved using a sound server.
It is an integral part of all relevant modern Linux distributions (Debian, Kali Linux etc.) and used in various mobile devices by multiple vendors.

Features

The main features includes:
  1. Per-application volume controls
  2. An extensible plugin architecture with support for loadable modules
  3. Compatibility with many popular audio applications
  4. Support for multiple audio sources and sinks
  5. Low-latency operation and latency measurement
  6. A zero-copy memory architecture for processor resource efficiency
  7. Ability to discover other computers using PulseAudio on the local network and play sound through their speakers directly
  8. Ability to change which output device an application plays sound through while the application is playing sound (without the application needing to support this, and indeed without even being aware that this happened)
  9. A command-line interface with scripting capabilities
  10. A sound daemon with command line reconfiguration capabilities
  11. Built-in sample conversion and resampling capabilities
  12. The ability to combine multiple sound cards into one
  13. The ability to synchronize multiple playback streams
  14. Bluetooth audio devices with dynamic detection
  15. The ability to enable system wide equalization

The Warning Message during boot

My Kali throws me this warning:
[warn] PulseAudio configured for per-user sessions ... (warning).
Debian variants also throws similar warning during boot.

To fix this do

Open terminal and copy the following 
leafpad /etc/default/pulseaudio

Find this line:
PULSEAUDIO_SYSTEM_START=0
Replace 0 with 1

PULSEAUDIO_SYSTEM_START=1
Where,
0 = don’t start in system mode, 1 = start in system mode
 
Reboot

Done...!!!

Tuesday, April 8, 2014

How To Find Your Own Mobile Number For All Operators

A guide about how to Find Your Own Mobile Number for Airtel , vodafone , Docomo , Aircel , Uninor , Reliance and Idea. Sometime We Forget our number or Sometime when  we take the new SIM that time we need to remember our number . This article tells you the solution for you by dialing USSD code on your Mobile phone you will be able get Your own Mobile number.
How To Find Your Own Mobile Number

-In Airtel

  1. *121*9#
  2. *140*1600#
  3. *400*2*1*10#
  4. *140*6575#
Dial the above USSD code on your Mobile phone to get your own Mobile number.

-In Vodafone

Type *111*2# and Press OK

-In Idea

Type *1# and Press OK or *798#

-In Aircel

Type *122*131#  and Press OK or try *#1# and Press Ok

-In Docomo

Dial the below given USSD
  1. *580#
  2. *1#
  3. *124#

-In Reliance

  1. *1#
  2. *111#

-In Uninor

Type *1# and Press OK if it does not work type 1 to 9 between *and # and Dial.
The above USSD code might be not work for everyone as the codes are area dependent. If you Know other working USSD to know own mobile number please write in comment area we will add it in this post.

How to Activate 3G On All Indian Telecom Networks

How to Activate 3G on All Indian Telecom Network Like Airtel , Aircel , Vodafone , Reliance , Idea , BSNL and Tata Docomo . Well This is The Generation Of Fast Internet Services so Everyone Wants to Use the 3G Services on Mobile Phone . Now A days All Mobile Phone Company are Making 3G Enabled Handset.
activate 3g


Here We have Brought to you 3G activation Procedure For All Indian Telecom network like  Airtel , Aircel , Vodafone , Reliance , Idea , BSNL and Tata Docomo .

3G Activation Procedure

Activate 3G on Airtel 
There is two to to activate 3G on Airtel either you Call the number 12134 or Send a SMS 3G to 121 . Airtel 3G Will be Activated on your Mobile Phone with Zero Rental Plan.
Activate 3G on Aircel
You need to type a Message START 3G and Send it to 121 . Setting will be delivered on your mobile phone  For Aircel 3G, Save the Settings and Start Browsing the Aircel 3G .
Activate 3G on Vodafone
Type an SMS ACT 3G and Send it to 111 For Post Paid users
Type an SMS  ACT 3G and Send it  To 144 For Prepaid users
Activate 3G on BSNL
To Activate BSNL 3G Please Type Message your Mobile Phone Company Name and model number of your mobile and send to the number 58355 .
Activate 3G on Idea
It is easy to start 3G Service in Idea Mobile Phone , Type  an SMS ACT 3G and Send it to  12345 .
Activate 3G on Reliance
To activate 3G in Reliance Please Type START 3G and Send it to  53733
Activate 3G on Tata Docomo 
To Activate TATA Docomo 3G Please send the message as 3Glife to 53333 .
We have Included All Way to Activate 3G For Above telecom Networks . If you are Still getting Problem and Not Able to Activate 3G On your Mobile For your Telecom Network Please Write in Comment Area or You Can Call the Respective Telecom Network Customer care For More Information.

APN ( Access Point Name ) For All Mobile Operator

If you want to Access internet on your mobile phone or PC you must have the Mobile Operator Access point Name ( APN ) . APN is Connector which works as getaway between your Computer to GPRS or 3G service. In Simple word APN will connect you to Internet. By Default we get Configuration in many mobile phone but some times we need to do it manually or if you are using intent on your PC through mobile phone you will need for manually setting  where you must know about APN.
apn list


APN ( Access Point Name ) List

  • Airtel APN  - airtelgprs.com
  • Vodafone APN – www
  • Idea APN - internet , imis
  • Aircel APN – aircelwap , aircelgprs
  • Uninor APN -Uninor ( U Must be written in Capital Letter )
  • Videocon APN – vinternet.com
  • BSNL APN – bsnlnet
  • TATA Docomo APN – TATA.DOCOMO.INTERNET
  • Reliance APN – rcomnet, smarinet , rcomwap
  • Virgin Mobile APN - vinternet
  • Loop Mobile APN - www
Please Note APN must be written in same letter  which I have written. If you are getting any problem please leave comment I am always ready to help you – Honhar Engineer