Honhar Engineer

Honhar Engineer
Thanks for visiting,stay connected for more updates !

Thursday, December 4, 2014

how to remove 'A username and password are being requested by http://widcraft.googlecode.com. The site says: "Google Code Subversion Repository" ' ?

http://honharengineer.blogspot.in/


For many days my blog was giving a pop up asking for User name and password as shown below.

A username and password are being requested by http://widcraft.googlecode.com. 
The site says: "Google Code Subversion Repository".  
This was an annoying pop-up and I know many people tried to solve this problem?  

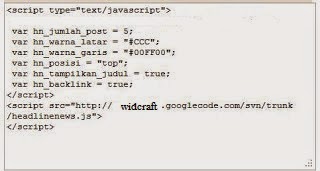
I came across a few sites mentioning this has something to do with the scripts used in widgets.  When I open up my design template and searching for the widcraft, it wouldn't appear?  I managed to view source using Firefox and located the script source which is inside one of widget as shown below.
http://honharengineer.blogspot.in/


Now, just remove this script and problem is solved.

Do comment if you are still facing any problem.

Saturday, October 11, 2014

android verisons with different API levels

http://honharengineer.blogspot.in/


The version history of the Android mobile operating system began with the release of the Android beta in November 2007. The first commercial version, Android 1.0, was released in September 2008. Android is under ongoing development by Google and the Open Handset Alliance (OHA), and has seen a number of updates to its base operating system since its initial release.
Since April 2009, Android versions have been developed under a confectionery-themed code name and released in alphabetical order; the exceptions are versions 1.0 and 1.1 as they were not released under specific code names:
  • Alpha (1.0)
  • Beta (1.1)
  • Cupcake (1.5)
  • Donut (1.6)
  • Eclair (2.0–2.1)
  • Froyo (2.2–2.2.3)
  • Gingerbread (2.3–2.3.7)
  • Honeycomb (3.0–3.2.6)
  • Ice Cream Sandwich (4.0–4.0.4)
  • Jelly Bean (4.1–4.3.1)
  • KitKat (4.4–4.4.4)
  • "L" release

Version history by API level

Platform VersionAPI LevelVERSION_CODE
Android 4.4 19 KITKAT
Android 4.3 18 JELLY_BEAN_MR2
Android 4.2, 4.2.2 17 JELLY_BEAN_MR1
Android 4.1, 4.1.1 16 JELLY_BEAN
Android 4.0.3, 4.0.4 15 ICE_CREAM_SANDWICH_MR1
Android 4.0, 4.0.1, 4.0.2 14 ICE_CREAM_SANDWICH
Android 3.2 13 HONEYCOMB_MR2
Android 3.1.x 12 HONEYCOMB_MR1
Android 3.0.x 11 HONEYCOMB
Android 2.3.4
Android 2.3.3
10 GINGERBREAD_MR1
Android 2.3.2
Android 2.3.1
Android 2.3
9 GINGERBREAD
Android 2.2.x 8 FROYO
Android 2.1.x 7 ECLAIR_MR1
Android 2.0.1 6 ECLAIR_0_1
Android 2.0 5 ECLAIR
Android 1.6 4 DONUT
Android 1.5 3 CUPCAKE
Android 1.1 2 BASE_1_1
Android 1.0 1 BASE

Sunday, September 14, 2014

android apps to get rree talktime/recharges on your mobile phones

http://honharengineer.blogspot.in/


Free Talktime/Recharges on our Mobile Phones is quite attention gaining thing these days.
Today most of us have Smartphones or Android phone’s so why not do the earning from them ? 
Its quite easy too and believe me even if half of the time devoted to chat on apps like 
Whatsapp/Hike/Line/WeChat etc. is given to these awesome earnings apps they will earn you a quite handy amount! . Which in turn can be used to redeem mobile recharges,Discount coupons etc amazing, isn’t it. 
Making the phone a real “Smart” one. 
So lets have a look on some of Best free Recharge apps to get free to get Talktime/Recharges right on your mobile by doing practically nothing!
Moreover,this free Money/Recharge thingy is quite unpredictable an app developer or company suddenly stops giving the Recharges(e.x MAdlock, UReward, PaisaWiz) or free benefits,thus resulting in Public Outage, hence I have posted only trustworthy apps and will update this post from time to time so no need to worry, you’re absolutely at right place. 

Hike- Messaging app Well, hike was the first app to bring on Free Recharges thing on the Indian market so it remains the first app and the most trusted app ever to win Free Recharges! and this made it the No.1 Indian App on the Play Store.
Method :  Go to hike Menu and use the “Rewards” function to invite your friends to hike by Free sms option, the more friends you invite the more recharges you get! You get Rs.20 Itself as a Sign-Up Bonus,and Rs.20 per friend you refer to hike.you can redeem your Free Recharge as soon as the amount Reaches Rs.50 . Nice way to earn easily isn’t it. If this was less,you also get Free Discount Coupons of Online Shopping Portals,Food Outlets such as Dominoes etc, for each day you remain online on hike!


WeChat- Messaging app
Last time it give away Rs. 60 and currently it is giving Rs. 150.
Stay tuned with it as these apps give recharge time to time.
Method : Just complete the things they ask you to do like sending stickers in group on daily basis and phone calls using their free calling service.

 
Line- Messaging app
Currently it is giving Rs. 120.
Stay tuned with it as these apps give recharge time to time.
Method : Just complete the things they ask you to do like sending stickers in group on daily basis or sending stickers to your friends.


mCent
mCent may be a newer entry for Indian users in this Free Recharge Category, but its present in the Global market from a long time, and i have earned quite a hefty amount from it.   
Method : mCent pays you Rs.10 as sign-up bonus, Plus it pays you Rs.20 for each friend you refer. There is minimum Amount for Redemption. and you can redeem your earnings even if though they are as Less as Rs.10
mCent also pays you for installing apps, Completing Offers and Surveys and its a good amount
On an average Rs.15 are credited to you,just for installing a Single app.! Talk more about awesomeness!


POKKT (Pocket Money App)
POKKT is another great app, which helps you  to earn free recharges, though the download of Other apps, its simple User interface makes it extremely easier to use.
Method : You can use friend referral link to invite friends to POKKT , you get Rs.5 for each friend referred to POKKT , in addition to the Money you get after you download the apps through POKKT.


Amulyam
Amulyam was the first company in India to sponsor free recharges through Ad-viewing . Naturally it wasn’t going to lag behind in the app-for-recharge race.
Method : Amulyam offers Money for installing apps upto the limit of Rs.40, frankly speaking the payout is never so high and infact Amulyam has comparatively lower payouts as compared to other apps. But its the Reliability where it marks ahead. Besides installing Apps and Viewing ads, you can also use the Invite Option to invite your friends.
Amulyam pays Rs.3 on per successful friend Invite.


FreePlus App
FreePlus app is an exciting new app launched with the same architecture to get Free Recharges and Gift Cards. Amount is credited each time you complete the offers by either downloading the apps through it or by viewing the ads.
Method : Install the FreePlus app,Register using your E-Mail ID, and start completing free offers such as Downloading Apps to get Free Recharge amount credited in your wallet. Each App downloaded through FreePlus can earn you upto Rs.20 (max), Also you can earn more by referring your friends to FreePlus. FreePlus provides you Rs.7 per successfull Friend Referral.


Earn Talktime app
Earn Talktime is yet another simple app which lets you earn money/credits by doing actions. Actions may be downloading an app or simply a friend referral.
You can earn upto Rs.20 per successful download and installation of App through Earn Talktime app, Plus you also get additional Rs.7 for each successful Friend Referral!


Ladooo
Ladoo is yet another awesome app to get free Recharges on your Mobile, and the earning methods are similar to the one’s discussed earlier
Method : Just install ladooo on your device and start earning! No need to even register .! Upto Rs.12 are paid per app installation and it also gives Rs.5 for each friend referral! Overall,another good and easy app to have when want to get recharges as well as have timepass.


My Screen
This app is the most unique and Great concept which I have come across, it asks you to Update your Profile,and adds your interests. Then it resides on your screen and shows you the Offers matching to your Interests! . Not only this you simply get paid for Running the App, and even for Making/Receiving a Call!!
Method : Update your profile to earn Points which can be later redeemed for Recharges!


ZipTT 
ZipTT is a newer Entry in this Recharge Market but its Reliable and it provides recharges for installing apps, Watching Videos, Completing Offers as well as referrals .
Method : ZipTT too works on the familiar Download apps to get Recharge,but it also has payment options for getting paid for visiting websites , filling forms there are payment options for watching Ads, Watching Videos and even for completing your profile!.  and once you install any application through it, Open the installed application for about 30Seconds and then leave it. Your cash on Apps credits will be credited to your account which can be redeemed for Mobile Recharges.
The ZipTT also has a referral Option It gives Rs.1 per referral .


Paisa Swipe
Paisa Swipe must be the most easiest of apps which enables you to earn money, all you have to do is install and allow it to be your lock-screen.
Method : it will automatically generate ads and you earn paisa Coins for each Successful unlock of the screen. These Paisa Coins can be then redeemed from the Paisa Swipe Auction using the Cash-out option present on the title bar.

Saturday, July 12, 2014

how to fix on Windows Start up Notepad Opens [.ShellClassInfo] LocalizedResourceName=@%SystemRoot%\system32\shell32.dll,-21787

http://honharengineer.blogspot.in/


For last couple of days when I start my computer I was seeing a desktop.ini file in notepad that opens on Windows start up containing the following text in it  
[.ShellClassInfo] LocalizedResourceName=@%SystemRoot%\system32\shell32.dll,-21787
Lets see how do I fix this to stop starting this notepad desktop.ini from windows 8 start up and this might also work on Windows 7, Windows XP if you are having same problem.

Method that I am going to suggest you will work on Windows 8 and above, 7, Vista, and XP. So fast and easy solution to get rid from these start up files is to open the location of the file that open on windows start-up and remove them.
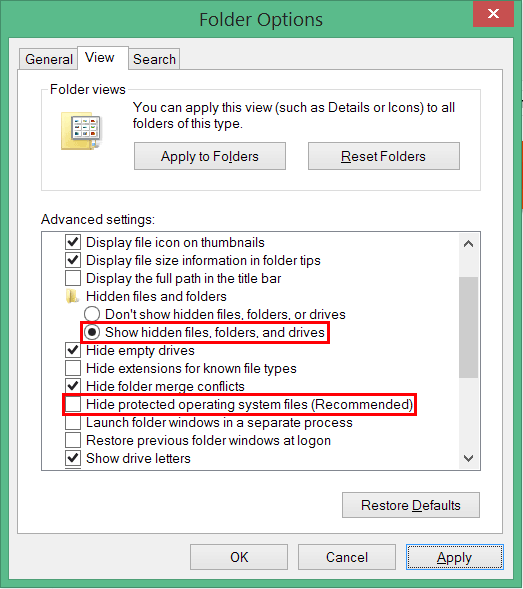
First you need to show hidden files on windows 8 to do that open Windows File Explorer > View Tab > click Options button on the toolbar.
To open Folder Options on Windows 7, click the Organize menu on File Explorer and on XP open “My Computer” and use the Tools menu.
Once you open the Folder Options window click the View tab, first Select the “Show hidden files, folders and drives” option and secondly uncheck the “Hide Protected operating system files (Recommended)” option. Click the OK button to save the settings.

http://honharengineer.blogspot.in/


Now goto ->
C:\ProgramData\Microsoft\Windows\Start Menu\Programs\StartUp
Here you will get desktop.ini so, just delete this
now restart your PC or laptop !!!

Friday, July 11, 2014

'mksdcard.exe' is missing from the SDK tools folder

http://honharengineer.blogspot.in/


You can download missing mksdcard.exe from given link -

After download place the downloaded file in tools folder of your SDK folder !!!


Friday, July 4, 2014

windows 8 keyboard shortcuts

http://honharengineer.blogspot.in


While using Windows 8's new interface in a traditional way might require some time to accommodate, the tasks of navigating through the operating system and its new apps can be simplified by using the keyboard shortcuts that Microsoft has made available. The shortcuts shared in this article were chosen by me while thinking what apps or settings you might access or use on a regular basis. They are simple enough to be easily grasped by anyone and they will help you be more productive in your daily tasks.

  1. Win + C– Brings up the Charms menu, where you can search, share, and change settings
  2. Win + D– Brings up the old Windows desktop
  3. Win + E– Launch Windows Explorer with Computer view displayed
  4. Win + F– Brings up the Metro File search screen
  5. Win + H– Opens the Metro Share panel
  1. Win + I– Opens the Settings panel, where you can change settings for the current app,     change volume, wireless networks, shut down, or adjust the brightness
  2. Win + J– Switches focus between snapped Metro applications
  3. Win + K– Opens the Devices panel (for connecting to a projector or some other device)
  4. Win + L– Lock PC and return to Lock screen
  5. Win + M– Minimize all Windows on the desktop
  6. Win + O– Locks device orientation
  7. Win + P– Choose between available displays
  8. Win + Q– Brings up the Metro App Search screen
  9. Win + R– Switch to the (classic) Windows desktop and display the Run box
  10. Win + U– Switch to the (classic) Windows desktop and launch the Ease of Access Center
  11. Win + V– Cycles through toasts
  12. Win + W– Brings up the Metro Settings search screen
  13. Win + X– Launch Start Menu
  14. Win + Y– Temporarily peek at the desktop
  15. Win + Z– Opens the App Bar for the current Metro application
  16. Win + Page Up / Down– Moves tiles to the left / right
  17. Win + Tab– Opens the Metro application switcher menu, switches between applications
  18. Win + , (comma)– Aero Peek at the desktop
  19. Win + . (period)– Snaps the current Metro application to one side of the screen (Right side)
  20. Win + Shift + . (period)– Snaps the current Metro application to the other side of the screen (Left side)
  21. Win + Space– Switch input language and keyboard layout
  22. Win + Shift + V– Cycles through toasts in reverse order
  23. Win + Enter– Launches Narrator
  24. Win + Arrow Keys – Switch to the (classic) Windows desktop and enable Aero Snap

Any queries or problems??? 
If any then comment below or if its useful then share it with your friends !!!


Wednesday, June 25, 2014

code completion not working in Eclipse


honharengineer.blogspot.in


Checking the Java Proposals check-box in
Window -> Preferences -> Java -> Editor -> Content Assist -> Advanced
should resolve this problem.

Monday, June 23, 2014

android.process.acore has stopped unexpectedly force close in Android emulater

honharengineer.blogspot.in


I had the same problem,but finally removed it completely & this is the solution :
The solution: 
In your AVD (Android Virtual Device) manager
Go to->
Settings –> Applications –> Manage Applications –> All 
(button on the top that lets you see all applications) –> scroll down to “Contacts Storage” –> 
Click on “Clear Data”.
 
IT WORKED EVEN IN THE EMULATOR,
you should do this to every emulator type you want to use !!!

Friday, June 6, 2014

windows 8.1 keyboard shortcuts

http://honharengineer.blogspot.in/


While using Windows 8.1's new interface in a traditional way might require some time to accommodate, the tasks of navigating through the operating system and its new apps can be simplified by using the keyboard shortcuts that Microsoft has made available. The shortcuts shared in this article were chosen by us while thinking what apps or settings you might access or use on a regular basis. They are simple enough to be easily grasped by anyone and they will help you be more productive in your daily tasks.


Shortcuts for the Start Screen and the Desktop

http://honharengineer.blogspot.in/

Windows Key = The action for this key depends on where you are when you press it. If you are on the Desktop when you press it, it takes you to the Start screen. If you press it again, it takes you back to the Desktop. But, if you press it while in a Windows 8.1 app, it takes you to the Start screen. Press it again and it takes you back to the app.
Ctrl + Tab = When using it on the Start screen, it switches between the Start screen and the Apps view. On the Desktop it does nothing. However, some web browsers will have the same shortcut for switching between tabs (e.g. Firefox) or for creating new tabs (e.g. Internet Explorer 11).
Windows Key + type an app name = When using it on the Desktop, it takes you to the Start screen and searches for installed apps using the name you typed in. When you are on the Start screen, pressing the Windows Key takes you to the Desktop. There you should only type the name of the app you want to use.
Escape - When using it on the Start screen, it closes the Start screen and switches to Desktop. This shortcut does nothing when you are on the Desktop.
Windows Key + E = Launches File Explorer both from the Desktop and the Start screen.
Windows Key + R = Launches the Run dialog that you can use to run programs or commands.
Windows Key + X = Launches a hidden menu with many useful shortcuts. This menu is also named the WinX menu or the power user's Start Menu.
Windows Key + L = Locks your Windows 8.1 PC or device and takes you to the Lock screen.
Windows Key + P = Opens the Project sidebar for extending your image to a second screen. If you have multiple screens or if you are using a video projector, this sidebar allows you to choose how the image should be displayed. You can keep the image on one screen, duplicate it, extend it to another screen or only display things on a secondary screen.
Windows Key + F1 = Launches the Windows Help and Support documentation provided by Microsoft.


Shortcuts for the Windows 8.1 Charm Bar & Modern Apps

http://honharengineer.blogspot.in/

Windows Key + C - Displays the Charms bar. You can navigate through the charms with the arrow keys on your keyboard.
Windows Key + Q = Launches the General Search. You can use this to search for files and settings on your PC, the Internet, and OneDrive, as well as through installed apps and the Windows Store.
Windows Key + F = Launches the Files Search. You can use this to search for files on your PC and OneDrive.
Windows Key + W = Launches the Windows Settings Search. You can use this to search for specific operating system settings by typing in certain keywords.
Windows Key + I = Displays the Settings charm. When using it on the Desktop, you can use this charm to access the Control Panel, Personalization options, the System information section and the Windows Help and Support module. You also have access to the wi-fi settings, volume and brightness control, notifications, power buttons and keyboard settings. When using it from the Start screen, you can use this charm to access the Start screen personalization options, tiles settings and the online help version for the Start screen. You can also use it when working with Windows 8.1 apps to access their settings.
Windows Key + H = Launches the Share charm. When using it on the Desktop, you can use this charm to share a desktop screenshot through the Mail app or other social network app that you have installed. When using it on the Start screen, you can use it to share a screenshot of the Start screen through the same channels. You can also use it to share data from Windows 8.1 apps that you are running.
Windows Key + K = Displays the Devices charm. Depending on the peripherals you have attached to your computer or Windows 8.1 device, you will have the option to play multimedia files, print information from modern apps or show the information on your screen on another display or video projector. This charm can only be used in modern Windows 8.1 apps.
Windows Key + Z = When using it on the Start screen, it displays the Start screen customization button at the bottom of the screen. When using it in modern apps, it displays different contextual options for each app.


Shortcuts for Switching Between Apps and Windows

http://honharengineer.blogspot.in/

Alt + Tab = Repeatedly pressing the Tab key while holding Alt pressed cycles through open windows and apps. Release the Tab key on the window or app that you want to open.
Windows Key + Tab = Repeatedly pressing the Tab key while holding the Windows Key pressed cycles through open modern apps while displaying them in a vertical sidebar at the left side of the screen. Release the Tab key on the app that you want to open.
Ctrl + Alt + Tab = When pressed together, this combination of keys displays the list of open windows and apps and keeps the list on screen even after you release the keys. You can then navigate through open windows and apps using the arrow keys.
Ctrl + Windows Key + Tab = When pressed together, this combination of keys displays the sidebar of open apps and keeps the sidebar on screen even after you release the keys. You can then navigate through open apps using the up/down arrow keys.


Shortcuts for Managing Desktop Windows

http://honharengineer.blogspot.in/

Windows Key + Arrow Up = When using it on the Desktop, it maximizes the current window across the screen. If the window is already maximized it has no effect. Also, it doesn't work on the Start screen.
Windows Key + Arrow Down = When using it on the Desktop in a maximized window, it restores the current window's size. Pressing it again while the window is restored causes the window to be minimized to the taskbar. If the window is already minimized it has no effect.
Windows Key + Shift Key + Arrow Up = When using it on the Desktop, it maximizes the current window vertically.
Windows Key + Shift Key + Arrow Left/Right = Moves the current window to the left or the right monitor. This works only when using multiple monitors.
Windows Key + Arrow Left/Right = When using it on the Desktop, it moves the current window to the left or right half of the screen. Pressing Windows Key + Arrow Left while the window is at the right of the screen, for example, restores the window. Pressing the combination again moves the window to the left half of the screen and vice versa. This can be used across multiple monitors.
Alt + Space = When using it on the Desktop, it launches the title bar menu of the current window. You can also access this menu by right clicking the title bar of the current window. The menu generally includes options to resize the window and other application specific options. Using this while on the Start screen has no effect.
F11 = When using it in desktop applications that are part of Windows 8.1, like File Explorer or Internet Explorer, it enables or disables the full screen view for the current window. Some third-party applications might support while many do not.


Shortcuts for the Windows 8.1 Taskbar

http://honharengineer.blogspot.in/

Windows Key + T = When using it on the Desktop, it highlights the first application in the taskbar. You can use the arrow keys to cycle through the taskbar applications. The applications that are running also display a thumbnail above their icon when you select them.
Windows Key + B = This works both on the Desktop and the Start screen. If the Notification Area Icons are set to "Always show all icons and notifications on the taskbar", this keyboard shortcut highlights the first application in the system tray. You can use the arrow keys to cycle through all the applications found in the system tray. If the "Always show all icons and notifications on the taskbar" is disabled, this keyboard shortcut highlights the "Show hidden icons" arrow. You can then press Enter to display the hidden icons or use the arrow keys to cycle through the applications found in the system tray.
Shift + click on a taskbar application = Launches a new instance of the selected application. This works only with applications which support running in multiple instances, like Microsoft Office or Internet browsers.
Ctrl + Shift + click on a taskbar application = Launches a new instance of the selected application with administrator rights. This works only with applications which support running in multiple instances, like Microsoft Office or Internet browsers.
Shift + right click on a taskbar application = Launches the contextual menu for that application instead of the list with recent items or pinned tasks or folders.
Windows Key + number keys 1 through 9 = Launches the taskbar application at the specified position. You can find more information about this in our dedicated article, Taskbar Productivity Tips & Shortcuts.


Conclusion

We tried to share a selection with the most useful keyboard shortcuts available in Windows 8.1. We didn't give you everything, only those that you are more likely to consider useful when using this operating system, its apps and features.
Let us know if you enjoy our collection and if you would like to know the keyboard shortcuts for performing actions that were not presented in this guide.
If you found it useful do share it with your friends !!!

Monday, May 12, 2014

how to remove windows multiple boot option?


http://honharengineer.blogspot.in/


 You need to fix your MBR (Master boot record).

Option One: Open Start-Run and enter msconfig Click the tab "BOOT.INI" The contents of the boot.ini file are shown and a number of configuration settings are available. Under Operating systems, delete the one you don't want. Be careful not to delete the wrong one.


http://honharengineer.blogspot.in/


Option Two: Right-click on "My Computer" and choose "Properties" from the context menu. The System Properties dialog box will open. In the section "Startup and Recovery" click the button "Settings". To delete the unwanted operating system from the boot display menu, use the "Edit" button on the right of the entry.

Option Three: If the OS is Windows XP Professional, it has a command line utility for manipulating boot.ini called bootcfg.exe.
Click start, type CMD, click OK and you are presented with the command prompt. Type bootcfg /? It will list the description and parameter list. Once again, you can delete the unwanted OS.

The option you choose depends on your preference but they all do same thing. But before you decide to mess with boot.ini, try this: Boot the system with windows CD, select the option to repair windows, type the password, type fixmbr. After that type fixboot. Restart the system and hopefully it will fix the problem without tinkering with boot.ini

If you have more question, let me know.

Sunday, May 11, 2014

how to fix windows 8.1 brightness problem

http://honharengineer.blogspot.in/


I have successfully found the solution for the problems you guys are facing!
I too had the same problem before, as it is because of the lack of display drivers of your device!
Steps to fix the problem:-
1.Right click on the MY COMPUTER icon on the desktop.
2.Select the Manage option.
3.Now select the Device Manager from the left pane on the screen.
4.Select the Display Adapters pane from the list on the center of your screen.
5.It will show you the installed display driver on your system. Right click on the driver and select the option update drivers.

Honhar Engineer

Once the drivers are updated to the required drivers for your system it will automatically enable your brighteness option and hotkeys on your keyboard.
Surely works!

Thursday, April 17, 2014

12 Things to Do Before Applying for Google Adsense

I know many of you want to make some good money with adsense right? 
But it’s not easy to get into adsense program now a days. You have to do few things before applying for adsense.
Google Adsense is world’s larges Ads Network and works at Pay Per Click system. It’s paying rates are better than all of other networks which is the biggest reason it is so popular to all Bloggers and Webmasters. But since everybody is running behind them, they have made the approval system very strict. You make little mistakes and get disapproved every time. So you need a complete guidance and list of thing that you need to do before applying for Google Adsense and supposing that you are ready.
12 Things to Do Before Applying for Google Adsense

12 Things to Do Before Applying for Google Adsense

1. Privacy Policy :

One of the common mistakes that every Blogger makes and that I made many times before finally getting approved. Even though there are people out there who say that having a Privacy Policy for a Blog doesn’t makes sense but they are wrong.
A Privacy actually describes to your readers about what they will get on your Blog , what they should do and what they should not. So obviously there is nothing bad in having a Privacy Policy. While it can affect somehow on your Adsense Approval, you must give it a try. You can write it yourself or find Privacy Policy Generators online (You don’t need a lawyer anyway).

2. About Page

An About has major role and importance if you don’t want to apply for Adsense. But when it comes to Adsense, they are about Zero chances of getting approved if you are not showing this page.About page simply describes about you and your Blog . This will not only help you establish a relationship with readers but it will also make them trust upon you.

3. Contact Us Page

It’s quite obvious that everyone has his/her own opinion. What one of your readers likes may be bothering someone else. Than it is better to give them opportunity to speak up to you and tell how they feel about your Blog, what they want to be edited , what they liked or hated.
It will also show the Google Adsense Team that is viewing your site that you actually care about your readers and not only the money and Adsense.

4. Name/ Email Verification

Make sure to put you Name and Email address in some easily visible area like About Me and Contact Us pages. It will confirm to Google Adsense Team that it is the same person who applied for Adsense and not some spam, crappy bots.

5. Age Verification

I’m really laughing out typing this. ;)
Why?
Because this is where I encountered a problem. Instead of 18, I accidentally published my age as 17 while on Adsense Application Form, it was accurately 18.
Hence there started a problem . Because Google Adsense is not for under 18 people. I realized this problem after being disproved a few times without any legitimate reason. So I advice you to be accurate while typing your age.

6. Minimum Number of Posts

There is no exact answer. Not even one. Because I have seen very established Blogs with 400+ posts and their owner telling me that Google Adsense is rejecting them while somewhere ,people with 40,50 posts are enjoying making money. Exactly what I said that there is no actual answer. However, we can always predict things. According to my experience , you should only apply after you have more than 70 posts. Posts length should must be 500+ words too.
Read : Difference Between Short Length Post Vs Length Posts – What’s Best?

7. Design

Your Blog is the biggest thing after Content. This represents your expertise ,experience and Professionalism. So be careful because anything can kill your Chances.

8. Content Type

Be careful with what type of content you are publishing. Because it is something that truly matters. Google Adsense is not for Pornographic, Illegal Items, Drugs or other Blogs / Sites like that. Also Adsense team won’t be willing to allow you to step in if you own a Non English Blog. Having posts shorter than 300 words in length is also Red Signal.

9. Providing Value

Don’t complain about not making money and don’t clearly state that your are Blogging for Money only and have no other interest in it. Because this will show them that you will not be providing values to your readers any day. Hence another Red Light glows up.

10. Top Level Domain

12 Things to Do Before Applying for Google Adsense
Those are gone far away when Adsense used to approve “Blogspot” and “WordPress.com” Blogs. As for today, you must have your own unique domain that specifies your Blog. If you don’t have one yet, stop dreaming about getting approved with Sub domains and go buy a Top Level Domain.
Another important thing about domain is it’s age. Because for most of Asian Countries, Adsense has placed an age restriction. They don’t accept any sites before they are 6 months old.

11. Other Ad Networks

If you have any other Ads placed like Chitika, Clicksor or anything, it’s time to drop them off.
Even Google Adsense allows you to use other Ad Networks along with them, it’s better to remove the ads before Applying and don’t put them back until you get a reply from Adsense Team.

12. Paid Traffic 

Google hates the sites that are getting Paid traffic and mostly penalizes them so there is not a damn chance of getting Adsense Approval letter for a site that is getting paid traffic. You can bring traffic from Search Engines or any other way you want but if you want to earn via Google Adsense the right way, paid traffic is not a solution.

Wednesday, April 16, 2014

how to remove “powered by Blogger”


As we all know Blogger is a free and widely used blogging platform and we are providing more tips and tricks for beginners. Here we will see about a simple trick on how to remove “powered by Blogger” attribution from your Blogger blog. People who are using Blogger platform will have this powered by Blogger attribution below their blog. It comes by default in every template and it is an official representation for Blogger. Removing powered by Blogger attribution is simple. Just follow this step by step tutorial on how to remove powered by Blogger attribution using new HTML editor.

How to remove powered by Blogger attribution

  1. Go to Blogger.com and login to your Blogger profile
  2. Select  your blog that you wish to remove this attribute
  3. Now go to template and click edit HTML
    How to remove powered by Blogger attribute
  4. Here drop-down “jump to widget” option and from that list selectAttribution1 as highlighted below
    how to remove powered by Blogger attribution
  5. Now in the editor press ctrl + F and find for this line <b:widget id=’Attribution1′ locked=’true’ title=” type=’Attribution’>
    How to remove powered by Blogger attribution
  6. Now replace the locked=’true’ in to locked=’false’ as you can see highlighted below
    How to remove powered by Blogger attribution
  7. Once done click save template
  8. Now go to layout option and at the below you can see attribution gadget, click edit.
  9. In that popup window click remove and you are done
    How to remove powered by Blogger attribution
Now go and view your site where you won’t see the “powered by Blogger” attribution.
Your copyright text is also removed along with powered by Blogger attribution. To add copyright text just click add a gadget in layout settings select HTML/JavaScript, add your copyright text and drag and drop it below. Removing this powered by Blogger attribution adds uniqueness to your blog and it shows your professionalism. Hope this helped you on how to remove powered by Blogger attribution.

Tuesday, April 15, 2014

Open RAR File / Extract RAR Files Under Linux or UNIX


RAR files are in compressed archive format, if you have downloaded rar files from the Internet, you need to unpack or unrar them (extract rar files). RAR is a proprietary file format for data compression and archiving, developed by Eugene Roshal. The command used to extract these files is called "unrar". By default, unrar is not being installed on Linux, FreeBSD or UNIX like operating system. You can install unrar command with the help of apt-get or yum command. 

Install unrar command

Under Debian or Ubuntu Linux, you need to type apt-get command as follows to install unrar program:
# apt-get install unrar
If you are using Fedora core Linux / CentOS / RHEL, use yum command as follows :
# yum install unrar
If you are using FreeBSD, enter:
# pkg_add -v -r unrar
If any of above, methods is not working for you, download binary package from official rarlab site:
$ cd /tmp
$ wget http://www.rarlab.com/rar/rarlinux-3.6.0.tar.gz
Next, untar file, enter:
$ tar -zxvf rarlinux-3.6.0.tar.gz
Both unrar and rar commands are located in rar sub-directory. Just cd to rar directory, type:
$ cd rar
$ ./unrar
Now copy rar and unrar file to /bin directory, type:
# cp rar unrar /bin

HowTo: Use unrar Command

The unrar command supports various options, below are common options that you need to for extracting files.

Task: Exreact rar (unpack) File

To extract file.rar file into the current directory, enter:
$ unrar e file.rar

Task: List (l) file inside rar archive:

$ unrar l file.rar

Task: To extract (x) files with full path type command:

$ unrar x file.rar
(D) To test (t) integrity of archive, file type command:
$ unrar t file.rar

How do I open rar file under MS-Windows XP/NT/2000/7/8?

  • If you are using MS-Windows XP / 7 / 8, download Winrar. It is free download (free to try License) software.

How To Add Auto Read More Button With Thumbnail in Blogger Blog?


Hello Friends! Hope that all of you are doing well. Today I have an important feature of Blogger to share with you. This feature is ‘Read More’ function.  Read More option enables us to show the some portion of the blog posts on the home page of blog or on the indexed or label pages. This is helpful feature because it is better to show more posts on the home page rather than showing a full lengthy single post.

This feature is coming inbuilt the new Blogger templates. But many Blogger Templates do not contain this feature and they show the full post on the blog or we have to manually add read more (Jump Break) between posts. Below I published the steps and code to add automatic read more option with thumbnail in your Blogger Template.

Auto Read More Button With Thumbnail.

  • First of all login into your Blogger account and select your blog.
  • Then go to Template > Edit HTML option.
  • Find the </head> tag in your template by pressing Ctrl + F.
  • Copy and paste the below given codes just above the founded tag.
<!-- Auto read more script Start -->
<script type='text/javascript'>
var thumbnail_mode = "yes"; //yes -with thumbnail, no -no thumbnail
summary_noimg = 430; //summary length when no image
summary_img = 340; //summary length when with image
img_thumb_height = 200;
img_thumb_width = 200;
</script>
<script type='text/javascript'>
//<![CDATA[
function removeHtmlTag(strx,chop){
if(strx.indexOf("<")!=-1)
{
var s = strx.split("<");
for(var i=0;i<s.length;i++){
if(s[i].indexOf(">")!=-1){
s[i] = s[i].substring(s[i].indexOf(">")+1,s[i].length);
}
}
strx =  s.join("");
}
chop = (chop < strx.length-1) ? chop : strx.length-2;
while(strx.charAt(chop-1)!=' ' && strx.indexOf(' ',chop)!=-1) chop++;
strx = strx.substring(0,chop-1);
return strx+'...';
}
function createSummaryAndThumb(pID){
var div = document.getElementById(pID);
var imgtag = "";
var img = div.getElementsByTagName("img");
var summ = summary_noimg;
        if(thumbnail_mode == "yes") {
if(img.length>=1) { imgtag = '<span style="float:left; padding:0px 10px 5px 0px;"><img src="'+img[0].src+'" width="'+img_thumb_width+'px" height="'+img_thumb_height+'px"/></span>';
summ = summary_img;
}
}
var summary = imgtag + '<div>' + removeHtmlTag(div.innerHTML,summ) + '</div>';
div.innerHTML = summary;
}
//]]>
</script>
<!-- Auto read more script End -->
  • Now find this code: <data:post.body/>
  • Replace this code with the code given below:
<!-- Auto read more Start -->
<b:if cond='data:blog.pageType == &quot;item&quot;'>
<data:post.body/>
<b:else/>
<b:if cond='data:blog.pageType == &quot;static_page&quot;'>
<data:post.body/>
<!-- http://www.hififun.net -->
<b:else/>
<div expr:id='&quot;summary&quot; + data:post.id'><data:post.body/></div>
<script type='text/javascript'> createSummaryAndThumb(&quot;summary<data:post.id/>&quot;);
</script>
<a class='more' expr:href='data:post.url'>Read more ...</a>
</b:if>
</b:if>
<!-- Auto read more End -->
  • Replace all if there is more than one code.
  • Save your template by clicking the Save button.
  • Done!
Test the working of this code by visiting to your blog.

Customization

If you want to customize the read more button with thumbnail then make the changes as explained below:

  • thumbnail_mode - change its value to ‘Yes’ if you want to show thumbnails along with post texts.
  • summary_img – Specify the number of characters you want to show with the thumbnail.
  • summary_noimg – Specify the number of characters you want to show without the thumbnail.
  • img_thumb_height and img_thumb_width -specify the thumbnail height and width (in pixels).
  • If you want to show something else instead of Read More text then you can change it with your own text.
I hope that this tutorial is helpful for you. If you are facing any problem or want to share your own experience then please explain it the comments bellow.

Thanks!

Monday, April 14, 2014

WiMAX and Wi-Fi Comparison


WiMAX is similar to the wireless standard known as Wi-Fi, but on a much larger scale and at faster speeds. A nomadic version would keep WiMAX-enabled devices connected over large areas, much like today.s cell phones. We can compare it with Wi-Fi based on the following factors.

IEEE Standards:

Wi-Fi is based on IEEE 802.11 standard where as WiMAX is based on IEEE 802.16. However, both are IEEE standards.

Range:

Wi-Fi typically provides local network access for around a few hundred feet with speeds of up to 54 Mbps, a single WiMAX antenna is expected to have a range of up to 40 miles with speeds of 70 Mbps or more. As such, WiMAX can bring the underlying Internet connection needed to service localWi-Fi networks.

Scalability:

Wi-Fi is intended for LAN applications, users scale from one to tens with one subscriber for each CPE device. Fixed channel sizes (20MHz).
WiMAX is designed to efficiently support from one to hundreds of Consumer premises equipments (CPE)s, with unlimited subscribers behind each CPE. Flexible channel sizes from 1.5MHz to 20MHz.

Bit rate:

Wi-Fi works at 2.7 bps/Hz and can peak up to 54 Mbps in 20 MHz channel.
WiMAX works at 5 bps/Hz and can peak up to 100 Mbps in a 20 MHz channel.

Quality of Service:

Wi-Fi does not guarantee any QoS but WiMax will provide your several level of QoS.
As such, WiMAX can bring the underlying Internet connection needed to service local Wi-Fi networks. Wi-Fi does not provide ubiquitous broadband while WiMAX does.

Comparison Table:

FreatureWiMax
(802.16a)
Wi-Fi
(802.11b)
Wi-Fi
(802.11a/g)
Primary
Application
Broadband Wireless
Access
Wireless LANWireless LAN
Frequency BandLicensed/Unlicensed
2 G to 11 GHz
2.4 GHz ISM2.4 GHz ISM (g)
5 GHz U-NII (a)
Channel
Bandwidth
Adjustable
1.25 M to 20 MHz
25 MHz20 MHz
Half/Full DuplexFullHalfHalf
Radio TechnologyOFDM
(256-channels)
Direct Sequence
Spread Spectrum
OFDM
(64-channels)
Bandwidth
Efficiency
<=5 bps/Hz<=0.44 bps/Hz<=2.7 bps/Hz
ModulationBPSK, QPSK,
16-, 64-, 256-QAM
QPSKBPSK, QPSK,
16-, 64-QAM
FECConvolutional Code
Reed-Solomon
NoneConvolutional Code
EncryptionMandatory- 3DES
Optional- AES
Optional- RC4
(AES in 802.11i)
Optional- RC4
(AES in 802.11i)
MobilityMobile WiMax
(802.16e)
In developmentIn development
MeshYesVendor
Proprietary
Vendor Proprietary
Access ProtocolRequest/GrantCSMA/CACSMA/CA